Emulating H3C Networks Outside HCL
My homelab involves devices from pretty different manufacturers (H3C, Fortinet, …), where I have been suffered a lot. It was quite common to see that I became disconnected from the Internet, because of dealing with the network configuration, especially the interoperability between different manufacturers. The good side is that it helps me to pick up various styles of configuration.
If all my devices were aligned by one manufacturer, I could just use their official emulator to redesign my networks in a volatile way. To reduce the waste of time, I really want to emulate my whole networks to facilitate a quick validation. But the bad news is that generic emulators like GNS3 / EVE-NG, never include H3C devices. Currently the only solution for emulating H3C networks is their official HCL, which is very heavy, and only targets at Windows.
While negating the reality is useless, it naturally derives the idea—“jailbreak” the devices outside HCL, make them running in QEMU instead.
Good News: Native i386 Images#
HCL utilizes VirtualBox and runs i386 guests for various devices. There are no
proprietary emulators.

H3C S6850
There are 4 virtual disks attached to the guest. Their partitions are listed here:
$ lsblk -f /dev/nbd{0..3}
NAME     FSTYPE FSVER LABEL UUID                                 FSAVAIL FSUSE% MOUNTPOINTS
nbd0
└─nbd0p1 vfat   FAT32       1A75-468D
nbd1
└─nbd1p1 vfat   FAT32       2C77-DBB6
nbd2
├─nbd2p1 vfat   FAT32       D257-0826
└─nbd2p2 vfat   FAT16       D2A2-D748
nbd3
├─nbd3p1 vfat   FAT32       D257-0826
└─nbd3p2 vfat   FAT16       D2A2-D748
After inspecting the contents, disks are used for:
- IDE 0 Master:
- FAT32: GRUB bootloader
- IDE 0 Slave:
- FAT32: Storing
.ipesystem images
- FAT32: Storing
- IDE 1 Master:
- FAT32: Flash
- FAT16: NVRAM
- IDE 1 Slave:
- FAT32: Flash
- FAT16: NVRAM
Bad News: impl !OutOfTheBox#
The images do not work out of the box, what’s even worse is that its way of interaction erases any possibility to make it run on existing network emulators.
DMI Validation#
The original VirtualBox machine definition contains something worthy of note:
| |
The device image will verify the DMI info in its kernel module system.ko:

Ghidra Showing DMI Verification
The solution is to add the following SMBIOS information when running QEMU
| |
Physical Link Interaction#
Network adapters for the virtual machines are listed here:
| |
The first NIC is actually a control channel between HCL and the device, for link status update and configuration synchronization.
If the first logical Ethernet port of a switch is connected to another switch, HCL will send a UDP
datagram to localhost:10001 with the following payload:
0000   41 63 74 69 6f 6e 3d 30 20 49 46 4e 4f 3d 31 20   Action=1 IFNO=1
0010   4e 49 43 49 44 3d 32 20 50 45 45 52 3d 31 20 44   NICID=2 PEER=1 D
0020   49 46 4e 4f 3d 30 20 44 65 76 54 79 70 65 3d 32   IFNO=0 DevType=2
0030   00 00 00 00 00 00 00 00 00 00 00 00               ............
The fields are used as:
Action:1for connected event,0for disconnected eventIFNO: # logical Ethernet port, starting from 1NICID: # virtual NIC, starting from 1, corresponding to VirtualBox definitionPEER: Peer type,1for switches,2for hosts (e.g. servers, PCs)DIFNOandDevTypeseem useless
The control message
Action=1 IFNO=1 NICID=2 PEER=1
means to bind the logical Ethernet port #1 (internally represented as something like GigabitEthernet1/0/1) of the device to virtual NIC #2 (the 2nd item in Network section, i.e. <Adapter slot="1" enabled="true" MACAddress="00E001021234"...), and detect the link status by sending and receiving a very strange PDU:
0000   47 46 45 4e 03 00 00 00 0b 00 00 00 00 00 00 00   GFEN............
0010   00 00 00 00 00 00                                 ......
If PEER=2, then the link status will be always UP.
What they adopted is an extremely unportable scheme, unless some network emulators support hooks on topology changes, it is impossible to conveniently have drop-in support for emulating H3C devices.
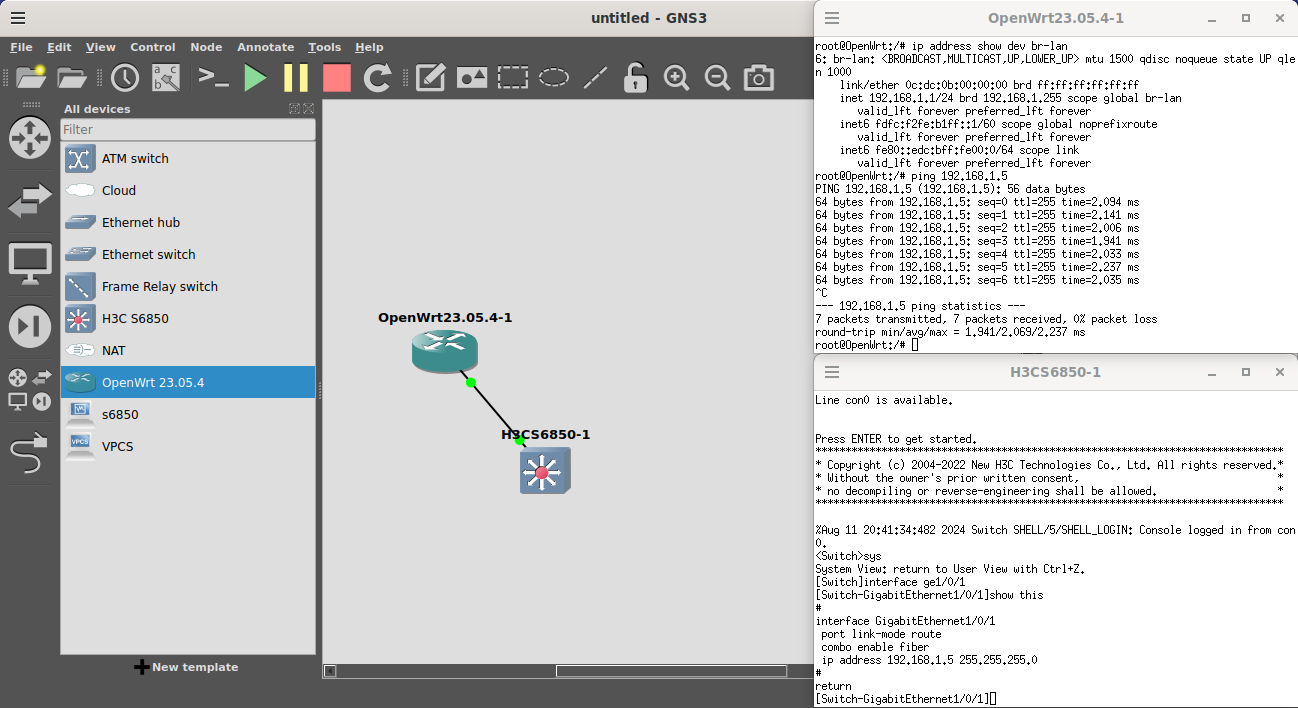
Running on QEMU and GNS3#
Get the disk images from HCL directory %programfiles(x86)%/HCL, where:
boot.vdiis located atresourceYOUR_DEVICE.vmdkis located atversion, for examples6850_b70.vmdkis forH3C S6850init.vdiis located atresource, as templates for data disksdata0.vdianddata1.vdi
Then you can boot up the device using QEMU like:
| |
To bring up an interface, construct the control packet like:
| |
To run in GNS3, a lot of details need to be filled in. This is the node JSON representation in the .gns3 file:
| |